Not everyone loves Christmas pudding or trifle, so we have put together a selection of our favourite alternative Christmas pudding alternatives.
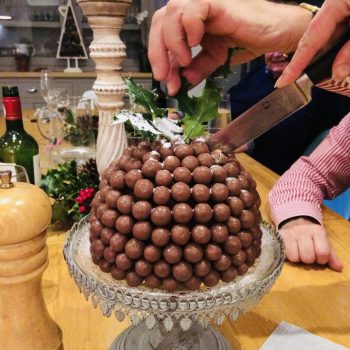
Millionaire’s Ice Cream Bombe
Our favourite and great for someone with a nut allergy. My sister did this for our family a couple of years ago as her son has a nut allergy and it was a huge hit.
Recipe by Cassie Best
Ingredients
- 250g digestive biscuits
- 50g butter, melted
- 200g dulce de leche or Carnation caramel
- 200g chocolate ice cream (not soft-serve)
- 300g caramel or vanilla ice cream (not soft-serve)
- 4 x 121g bags Maltesers
- 150ml double cream
- 200g bar dark chocolate, finely chopped
To serve
- holly, to decorate (optional)
- icing sugar, to serve (optional)
Method
STEP 1
Line a 1.2-litre pudding bowl with a double layer of cling film, leaving plenty overhanging, and make a space for the bowl in the freezer. Put the biscuits in a food processor and blitz until they resemble fine crumbs. Add the butter and 2 tbsp caramel, and blend until well mixed. Save about 3 tbsp for the top and tip the rest into the lined pudding bowl. Use the back of a spoon to press evenly over the base and up the sides of the bowl. Freeze for 30 mins.
STEP 2
Remove the chocolate ice cream from the freezer and allow it to soften at room temperature for 10 mins. Remove the pudding bowl from the freezer too (the biscuits should be firm by now.) Spoon the ice cream into the biscuit- lined bowl, packing it into the base. Spoon over the remaining caramel, spreading it to the biscuit walls. Return to the freezer for 30 mins.
STEP 3
Remove the caramel ice cream and allow it to soften for 10 mins. Meanwhile, tip 75g Maltesers into a bowl and lighty crush with the end of a rolling pin, leaving some chunky bits. Add the ice cream to the bowl and stir through the Malteser pieces – work quickly so the ice cream doesn’t melt too much. Remove the pudding bowl from the freezer and tip in the Malteser ice cream, spreading it to completely fill the bowl, then level the top. Scatter with the remaining biscuit crumbs. Return to the freezer for at least 4 hrs (or for up to 2 weeks).
STEP 4
Put the cream in a pan and heat until steaming hot but not boiling. Put the chocolate in a large bowl and pour over the cream. Leave to stand for 1-2 mins, then stir to make a smooth ganache. Set aside to cool until the sauce thickens to a spreadable consistency (you can speed this up by putting it in the fridge, but remember to stir it every 5-10 mins or it will set around the edges).
STEP 5
Remove the pudding bowl from the freezer. Turn it onto a plate and remove the bowl and cling film. Spread half the chocolate ganache all over the pudding and, as quickly as you can, stick the remaining Maltesers all over the surface – this is easiest if you start around the bottom and work your way up in layers. The chocolate ganache will start to set, so use a little more from the bowl to make the Maltesers stick. Once covered, return to the freezer for at least a further 4 hrs (or for up to 3 days), removing it 10 mins before serving. Top with a dusting of icing sugar and a sprig of holly, if you like.
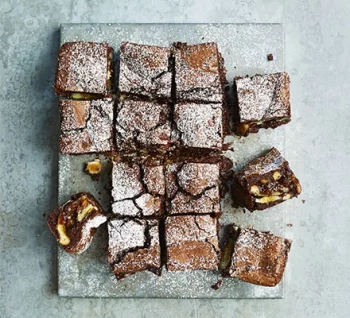
Mince Pie Brownies
Recipe by Lulu Grimes
Ingredients
- 185g unsalted butter, cubed
- 185g high-quality dark chocolate, chopped
- 85g plain flour
- 40g cocoa powder
- 3 large eggs
- 275g golden caster sugar
- 6 mince pies or 9-12 mini mince pies
- icing sugar, for dusting
Method
STEP 1
Melt the butter and chocolate in a medium bowl, either in a microwave – cooking for 1 min on High, then stirring and continuing to heat in 20-second blasts – or by setting the bowl over a pan of simmering water and stirring occasionally. Once melted, leave the mixture to cool.
STEP 2
Heat the oven to 180C/160C fan/gas 4. Line the base of a shallow 20cm square tin with non-stick baking parchment. Sieve the flour and cocoa into a medium bowl. Whisk the eggs and sugar with an electric mixer on maximum speed until thick and creamy, about 3-8 mins, or when the mixture runs off the beaters and leaves a trail for a second or two.
STEP 3
Pour in the cooled chocolate mixture, then fold together with a rubber spatula in a figure of eight, moving the bowl round until the mixture is a mottled dark brown. Be gentle so you don’t knock out the air.
STEP 4
Sift in the cocoa and flour mixture and continue gently folding. The mixture will look dry and dusty, then fudgy. Stop just before you feel you should, as you don’t want to overmix it.
STEP 5
Spoon a little mixture into the prepared tin, then add the mince pies, leaving them whole. Scrape over the rest of the mixture, gently easing it between and over the pies. Level the top. Put in the oven for 25 mins. If the brownie mixture is very wobbly in the middle, it’s not quite done, so bake for another 5 -10 mins, or until the top has a shiny, papery crust and the sides are just beginning to come away from the tin. Take out of the oven and leave to cool in the tin. Dust with icing sugar. Cut into quarters, then cut each quarter into four squares. Will keep in an airtight container for a week and in the freezer for up to a month.
Alternatively you could make life easier by using the Katie Bakes Brownie mix and then adding the mince pies according to step 5 above and baking as per the instructions on the Katie Bakes Brownie Mix.
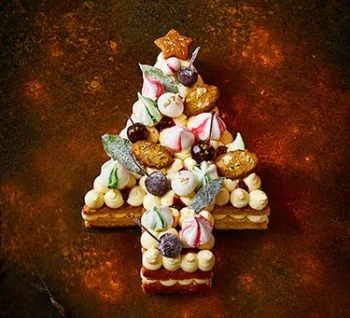
White Forest Christmas Tree Traybake
Another alternative for those who have a nut allergy.
Recipe by Anna Glover
Ingredients
- 250g softened salted butter , plus extra for the tin
- 250g caster sugar
- 4 large eggs
- 225g self-raising flour
- ½ tbsp ground cinnamon
- ½ tbsp ground ginger
- 1 tsp baking powder
- 150g natural yogurt
- ½ tbsp vanilla paste
- 50g white chocolate chips
- festively shaped ginger biscuits
For the leaves, cherries and jam
- 1 egg white
- 25g caster sugar
- 5-6 fresh bay leaves , washed and dried
- 5-6 cocktail cherries with stalks, drained
- 125g morello cherry jam
- edible glitter (optional)
For the meringues
- 1 egg white
- 100g caster sugar
- green and red food colouring gel
- gold leaf and edible glitter, to decorate (optional)
For the buttercream
- 250g softened butter
- 400g icing sugar
- 1 tbsp vanilla paste
- 2 tbsp milk
Method
STEP 1
To make the frosted leaves and cherries, whisk the egg white with a fork until frothy. Tip the sugar onto a plate. Brush the egg white onto the bay leaves or dip them, then sprinkle the sugar over the leaves and half the cherries to coat. Leave to dry on a sheet of parchment for 6 hrs or until the frosting has completely dried.
STEP 2
Heat the oven to 180C/160C fan/gas 4. For the sponge, butter and line a 30 x 20cm traybake tin with parchment. Beat the butter and sugar together in a large bowl with an electric whisk until creamy. Whisk in the eggs, one by one, then sieve and fold in the flour, spices and baking powder. Fold in the yogurt, vanilla and chocolate chips. Tip into the tin, smooth over and bake for 30-35 mins until the sponge is golden and springs back when pressed. Leave to cool in the tin for 10 mins, then turn out onto a wire rack, remove the parchment and leave to cool completely. Or, to make a round cake, see our tip below.
STEP 3
Reduce the oven to 120C/100C fan/gas ½ and leave the door open briefly to make sure the temperature drops low enough. To make the meringues, whisk the egg white in a large bowl with an electric whisk, or in the bowl of a stand mixer with the whisk attachment, until stiff peaks form. Continually whisking, add the sugar, 1 tbsp at a time, until it’s completely combined. Once it’s all added, beat for another 3-4 mins until you get a stiff, shiny meringue. Transfer the mixture to two small piping bags fitted with star and round nozzles. Use a cocktail stick, knife or spoon dipped in the food colouring to paint the inside of the bags in stripes up the length, painting each bag with a different colour and leaving the area nearest the nozzle uncoloured, then fill with meringue. Cover a baking sheet with parchment, using a little of the meringue on the underside to stick it to the tray. Pipe blobs onto it, well spaced apart, to make meringue kisses – they will come out plain first. Bake for 30 mins, then turn off the oven and leave the meringues inside to cool to room temperature. Decorate them with gold leaf or glitter, if you like.
STEP 4
Press the jam firmly through a sieve to remove any large chunks and stir what’s left in the sieve back into the jar. Stir in a few pinches of glitter, if you like, then transfer to a piping bag fitted with a small round nozzle.
STEP 5
Beat the buttercream ingredients together using an electric whisk until you get a pale, fluffy icing. Transfer to a large piping bag with a wide, round nozzle.
STEP 6
To cut the sponge into a tree shape, first split the cooled cake into two layers using a cake cutter or serrated knife. Using a ruler or a sheet of baking parchment the same width as the cake, mark a halfway point at the top end of the cake. At the bottom end of the cake, mark it into thirds. Using these as a guide, cut squares from the bottom end of the cake, leaving a centre section for the tree stump, then cut from your middle mark at the top down to the bottom edges to create a Christmas tree shape. Use the off-cuts to make cake pops, or in trifle. Carefully lift off the top sponge using a baking sheet, and pipe blobs of buttercream all over, starting from the outside edge. Chill for 20 mins to firm up. Pipe some of the jam between the buttercream blobs, except the outer edge.
STEP 7
Position the remaining cake on top, and pipe more icing blobs all over. Add the frosted leaves, frosted and plain cherries, ginger biscuits (see our recipe) and meringues, sprinkle a little glitter over the un-frosted cherries, and pipe on the remaining jam in blobs. Add the biscuits, putting a star-shaped one at the top, and add gold leaf, if you like. Will keep, well covered in the fridge, for two-three days.
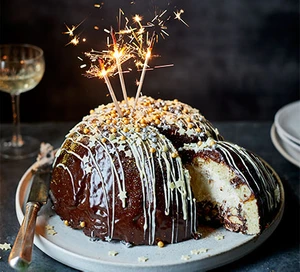
Rocky Road Cheescake Bombe
This was our Christmas day pudding last year and it was a great success. Plus I really enjoyed making it.
Recipe by Cassie Best
 Ingredients
- 2 x 200g ready-made chocolate loaf or marble loaf cakes
- 225ml double cream
- 150g dark chocolate, finely chopped
- 2 tbsp golden syrup
- 50g white chocolate
- edible glitter, chocolate truffles, sprinkles and sparkles, to decorate (optional)
For the cheesecake filling
- 2 x 280g tubs full-fat cream cheese
- 200ml double cream
- 75g icing sugar
- 2 tsp vanilla bean paste or extract
- ½ orange, zested
For the rocky road
- 150g dark chocolate
- 75g butter
- 1 tbsp golden syrup
- 75g digestive biscuits
- 25g pretzel pieces
- 50g mini marshmallows
Method
- STEP 1
Line a 2 litre pudding bowl with cling film, leaving some overhanging to cover the top later. Thinly slice the cakes lengthways (8-9 slices per cake) and use the slices to line the base and sides of the bowl, making sure there are no gaps.
- STEP 2
Mix the ingredients for the filling with an electric hand whisk until thick and smooth. Fill the lined bowl with it, leaving some space for the rocky road to go on. Set aside.
- STEP 3
Break the chocolate for the rocky road into pieces in a heatproof bowl. Add the butter and golden syrup. Set over a pan of simmering water and leave for a few mins until melted – turn the heat off if the water boils, the residual heat will be enough to melt it. Stir until smooth and glossy.
- STEP 4
Tip the biscuits into a food bag and crush to a rubble with a rolling pin, creating some fine crumbs and some bigger pieces. Tip into the chocolate mix with the pretzel pieces and marshmallows. Mix until everything is coated in chocolate. Spoon it all over the cheesecake, covering the surface. Wrap the bowl in cling film and place a plate on top with a can to weigh it down. Chill for at least 24 hrs, or up to three days.
- STEP 5
Decorate the cheesecake on the day you want to serve it. Heat the cream, chocolate and golden syrup in a pan over a low-medium heat until the chocolate has melted and you have a pourable mixture – don’t let it boil. Unwrap the cheesecake and turn onto a wire rack with a tray underneath. Pour over the chocolate glaze to cover the entire cake. When it stops dripping, use a fish slice to transfer to a plate. Chill until the glaze has set (about 10 mins).
- STEP 6
Meanwhile, melt the white chocolate in shorts bursts in the microwave. Drizzle it over the top of the cake, then decorate as you like. We used edible glitter, gold sprinkles and chocolate truffles.
Recipes and some images courtesy of BBC Good Food.


 Ingredients